
Integrating the SDK
Introduction
The DIGITALREEF SDK is delivered as a zipped folder containing a Flutter plugin. It includes the following main contents:
- drplugin folder
- DR SDK Android library (AAR file)
- Configuration's file 'drconfig.json'
- AndroidManifest.xml (Permissions needed for DR-SDK)
- iu-proguard.txt (Support file for obfuscation of the codebase)
- google-services.json (Support file for FCM Message integration)
Current version of DR SDK for Android: 4.15.3
Current version of DR SDK for iOS: 4.14.1
Integration overview
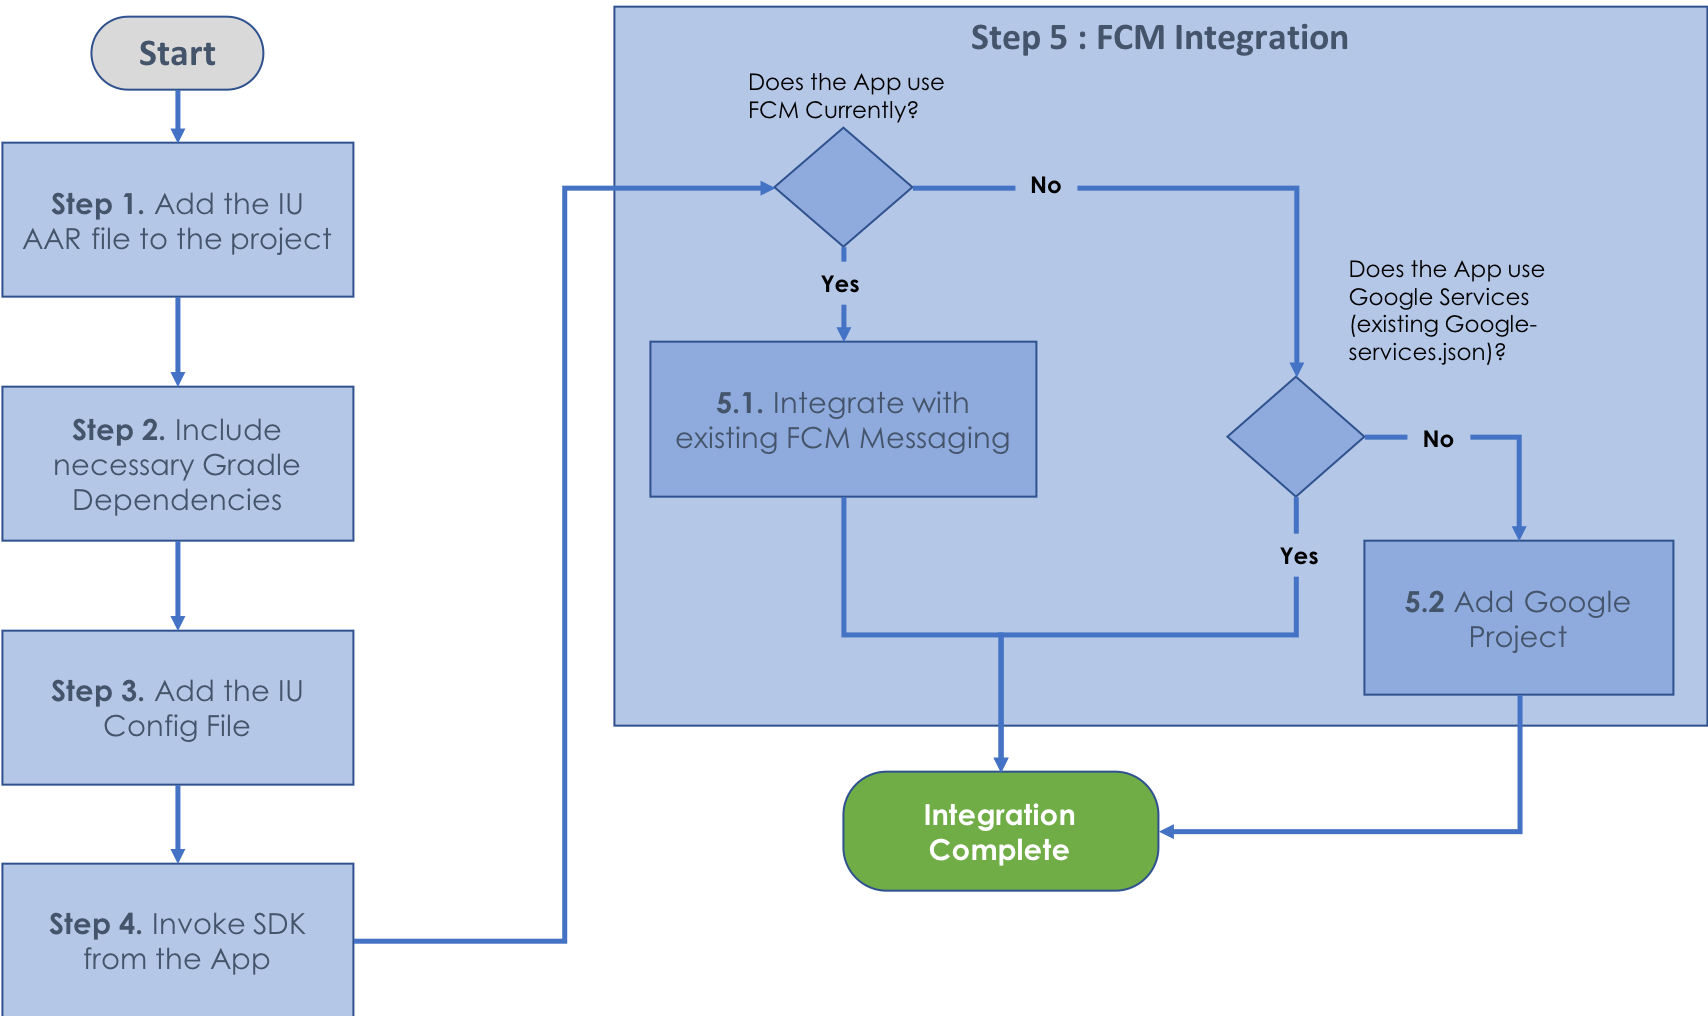
Steps to Integrate the drplugin into the Project:
- Unzip the drplugin folder.
- Create a folder named "package" in the flutter project root folder.
- Add the unzipped drplugin folder inside the "package" folder.
- Open the "pubspec.yaml" file in the flutter project root folder and add the following lines in the "dependencies:" section:
dependencies:
  drplugin:
    path: package/drplugin
  firebase_core_platform_interface: ^4.8.0
  firebase_core: ^2.14.0
firebase_messaging: ^14.6.4- In the terminal, navigate to the flutter project root folder and run the commands:
flutter pub getflutter pub upgrade
Android Integration
In the android app folder, add the following:
a. google-services.json
b. proguard-rules.pro
c. The assets folder and into this one add drconfig.json (folder must be created at path --> android/app/src/main/assets)
d. Create a libs folder and into this one add amlibrary.aar (folder must be created at path --> android/app/libs)
e. In build.gradle (project level), add this dependency:
dependencies {
    classpath 'com.google.gms:google-services:4.3.10'
}
f. In build.gradle (app level), add the following dependencies:
repositories {
    flatDir {
        dirs 'libs'
    }
}

dependencies {
    // GSON
    implementation 'com.google.code.gson:gson:2.8.9'
    // Room
    implementation 'androidx.room:room-runtime:2.4.1'
    annotationProcessor 'androidx.room:room-compiler:2.4.1'
    implementation 'com.squareup.okhttp3:okhttp:4.9.3'
    // Dynamic Animation
    implementation 'androidx.dynamicanimation:dynamicanimation:1.0.0'
    // Google Play library to obtain the Android ID
    implementation 'com.google.android.gms:play-services-ads:20.5.0'
    //Geofence Play library to obtain the Location
    implementation 'com.google.android.gms:play-services-location:19.0.1'
    // FCM Dependencies
    implementation platform('com.google.firebase:firebase-bom:29.0.4')
    implementation 'com.google.firebase:firebase-config'
    implementation('com.google.firebase:firebase-messaging') {
        exclude group: 'org.json', module: 'json'
    }

    // Workmanager
    implementation "androidx.work:work-runtime:2.8.1"
    implementation 'com.google.android.gms:play-services-ads-identifier:18.0.1'
    implementation 'androidx.dynamicanimation:dynamicanimation:1.0.0'
    implementation(name: 'amlibrary', ext: 'aar')
}

apply plugin: 'com.google.gms.google-services'
g. Create a class that extends from Application:
public class MyApp extends Application {

    @Override
    public void onCreate() {
        super.onCreate();
        IUApp.init(this,null);
    }
}
h. Update AndroidManifest.xml:
<application
    ...
    android:name=".MyApp"
    android:allowBackup="false"
    android:fullBackupContent="@xml/backup_descriptor"
    android:usesCleartextTraffic="true"
    ... >
    ...
</application>
Sample backup_descriptor.xml code (placed in res/xml/ folder):
<?xml version="1.0" encoding="utf-8"?>
<full-backup-content>
    <exclude
        domain="sharedpref"
        path="IU_AMAZONIA.xml" />
</full-backup-content>
Permissions for Querying installed applications list
[DEPRECATED] With Android 11 and above, apps are restricted from reading other installed applications (link: https://support.google.com/googleplay/android-developer/answer/10158779?hl=en).
-
If you still need to collect installed apps, add the following snippet to your Android Manifest:
<queries> <intent> <action android:name="*" /> </intent> </queries>Note that if you choose to access user-installed apps, it is mandatory to add a runtime permission to your app, informing the user about the collection, its purpose, and allowing them to opt out. The Data Disclosure dialog can be used for this runtime permission.
iOS Integration
- Pod Install:
a. Navigate to the flutter project root folder in the terminal.
b. Run the commands:
flutter pub getcd iospod deintegrate && pod install
c. Open the project in Xcode.
d. Add the following line to the AppDelegate:
override func application(
        _ application: UIApplication,
        didFinishLaunchingWithOptions launchOptions: [UIApplication.LaunchOptionsKey: Any]?
    ) -> Bool {
        GeneratedPluginRegistrant.register(with: self)
        UNUserNotificationCenter.current().delegate = self

        SwiftDrpluginPlugin.share.mainViewController

 = window?.rootViewController

        return super.application(application, didFinishLaunchingWithOptions: launchOptions)
    }
e. Add Local Config file
DigitalReef SDK needs a local configuration file in the form of plist file.
<?xml version="1.0" encoding="UTF-8"?>
<!DOCTYPE plist PUBLIC "-//Apple//DTD PLIST 1.0//EN" "http://www.apple.com/DTDs/PropertyList-1.0.dtd">
<plist version="1.0">
<dict>
	<key>organization</key>
	<string>IU</string>
	<key>organizationId</key>
	<string>5a294f81993c8f1570c2550d</string>
	<key>fallbackURL</key>
	<string>https://sdk.digitalreef.com/v1/configs/remote</string>
	<key>timerTriggerConfig</key>
	<string>86400</string>
	<key>version</key>
	<string>1</string>
	<key>buildType</key>
	<string>SDK</string>
	<key>fcmProjectId</key>
	<string>iu-android-sdk</string>
	<key>fcmSenderId</key>
	<string>117519441630</string>
	<key>fbRemoteProjectId</key>
	<string>iu-android-sdk</string>
	<key>fbRemoteAPIKey</key>
	<string>AIzaSyAuiuXvkX3hbXTZv1q1KUh3PbvvTT2tb04</string>
	<key>fbRemoteAppId</key>
	<string>1:117519441630:android:7962cb3d01ff3cc2</string>
</dict>
</plist>
You would need to update the value of organization and organizationId in the above list.
Sample plist file looks as below:

- Add Permissions
DR SDK needs few permissions which are listed below:
- NSUserTrackingUsageDescription
- UIBackgroundModes
- Background fetch
- Remote notifications
Please add NSUserTrackingUsageDescription as a key to your original Info.plist file. Add the correct description for using the IDFA:

Add the following Background Modes:

- Create Notification Service Extension
To receive and display the Rich images in Push Notification, add the following code to NotificationService extending UNNotificationServiceExtension
Reference : Rich Notifications from Apple
#import "NotificationService.h"
#import <DigitalReefSDK/DigitalReefSDK.h>

@interface NotificationService ()

@property (nonatomic, strong) void (^contentHandler)(UNNotificationContent *contentToDeliver);
@property (nonatomic, strong) UNMutableNotificationContent *bestAttemptContent;

@end

@implementation NotificationService

- (void)didReceiveNotificationRequest:(UNNotificationRequest *)request withContentHandler:(void (^)(UNNotificationContent * _Nonnull))contentHandler {
    self.contentHandler = contentHandler;
    self.bestAttemptContent = [request.content mutableCopy];

    [DigitalReef includeMediaAttachmentWithRequest:request mutableContent:self.bestAttemptContent contentHandler:self.contentHandler];
}

- (void)serviceExtensionTimeWillExpire {
    // Called just before the extension will be terminated by the system.
    // Use this as an opportunity to deliver your "best attempt" at modified content, otherwise the original push payload will be used.
    self.contentHandler(self.bestAttemptContent);
}

@end
import UserNotifications
import DigitalReefSDK

class NotificationService: UNNotificationServiceExtension {

    var contentHandler: ((UNNotificationContent) -> Void)?
    var bestAttemptContent: UNMutableNotificationContent?

    override func didReceive(_ request: UNNotificationRequest, withContentHandler contentHandler: @escaping (UNNotificationContent) -> Void) {
        self.contentHandler = contentHandler
        bestAttemptContent = (request.content.mutableCopy() as? UNMutableNotificationContent)
        DigitalReef.includeMediaAttachment(request: request, mutableContent: bestAttemptContent!, contentHandler: contentHandler)
    }

    override func serviceExtensionTimeWillExpire() {
        // Called just before the extension will be terminated by the system.
        // Use this as an opportunity to deliver your "best attempt" at modified content, otherwise the original push payload will be used.
        if let contentHandler = contentHandler, let bestAttemptContent =  bestAttemptContent {
            contentHandler(bestAttemptContent)
        }
    }
}
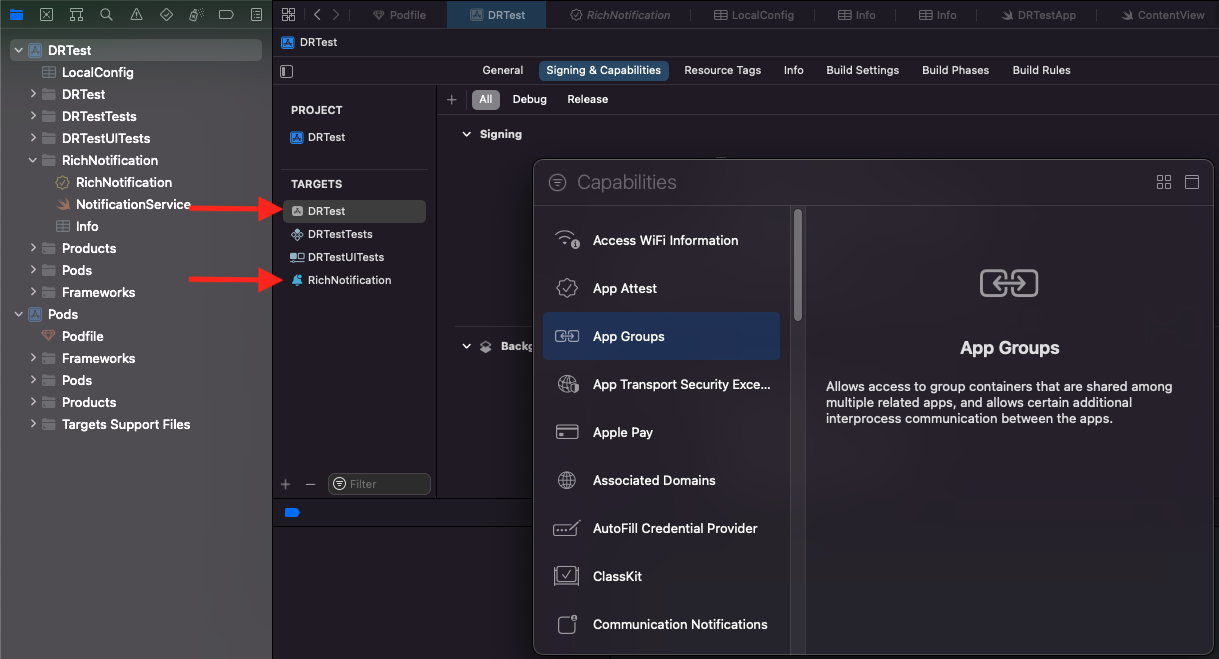
- Add App Groups
Go to your app target and add a Capability called App Groups. Do the same for your Rich Notification target:
Add the following App Groups to:
a. Host Application's Info.plist
b. Rich Notification service extension's Info.plist
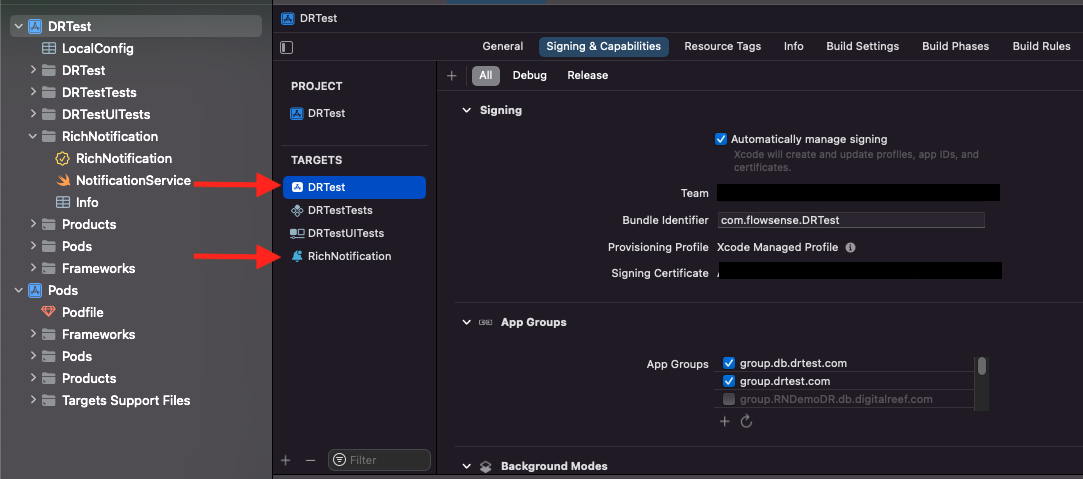
App Group DataApp Group's data should be same in both Host Application and Rich notification service extension.
<key>dbAppGroup</key>
<string>group.db.YOURAPPNAME.com</string>
<key>userDefaultsAppGroup</key>
<string>group.YOURAPPNAME.com</string>
Once added it would be similar to the image below

App Groups NamingAppGroups string must be different for each host application otherwise there will be a shared database storage and shared user defaults storage between different apps.
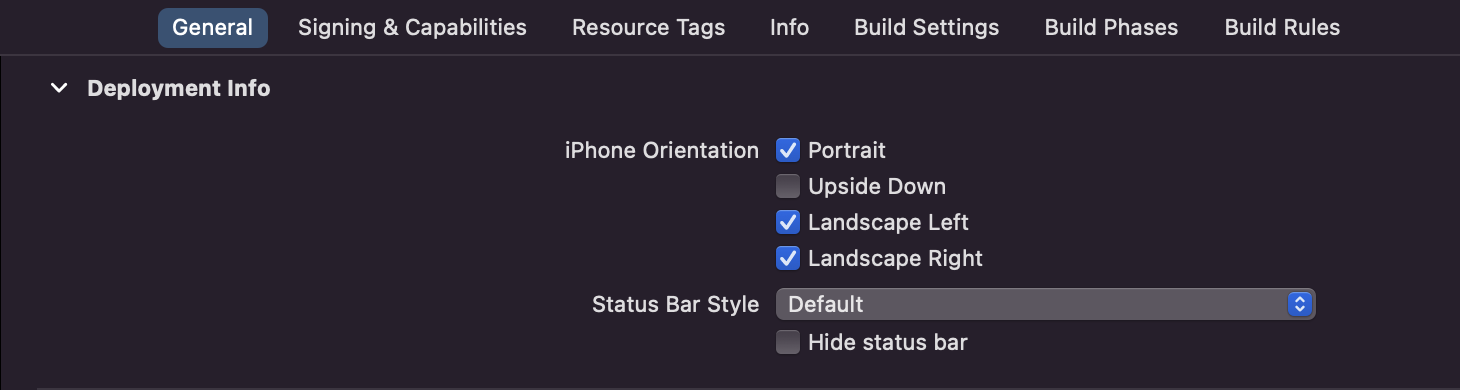
- App Orientation (Optional)
Check the button at least once in order to add this key (UISupportedInterfaceOrientations) in the info.plist file or it can be added explicitly in the info.plist file by adding the key (UISupportedInterfaceOrientations) in the Info.plist file
<key>UISupportedInterfaceOrientations</key>
<array>
	<string>UIInterfaceOrientationLandscapeLeft</string>
	<string>UIInterfaceOrientationLandscapeRight</string>
	<string>UIInterfaceOrientationPortrait</string>
<string>UIInterfaceOrientationPortraitUpsideDown</string>
</array>
Host App OrientationAdd the orientation as per the Host App support. SDK does not need all orientation, and can work with only one orientation as well.