
Integrating the SDK
Introduction
- DIGITALREEF's SDK is delivered as a zipped folder containing React Native library. The main contents of the zip file are:
- react-native-iu-library folder
- DR SDK Android library (AAR file)
- Configuration's file 'drconfig.json"
- IuLibraryModule.java (Support file for React Native invocation)
- IuLibraryPackage.java (Support file for React Native invocation)
- AndroidManifest.xml (Permission needed for DR-SDK)
- iu-proguard.txt (Support file for obfuscation the codebase)
- google-services.json (Support file for FCM Message integration)
- react-native-iu-library folder
- Current version of DR SDK for Android 4.11.1 and iOS is 4.9.1
Integration Overview
Step 1: Extract the ReactNative-amlibrary.zip
Extract the ReactNative-amlibrary.zip file shared by DR team to an easily accessible folder to integrate with your project.
Step 2: Open terminal (Mac / Linux) or Command prompt (Windows)
Open the Command prompt (windows) / Terminal (Linux / Mac) and change directory to your project.
Step 3: Add the DR React Native library
In command prompt / Terminal type the following command.
Remove Old version of SDKIf the Host app has already integrated DR SDK then run the following command to remove the dependency files first and then proceed with the steps below.
Command to remove the library
yarn remove react-native-iu-library
yarn add <extracted folder>\react-native-iu-libraryAndroid
The following diagram shows an overview of the integration process for the DR SDK.

Assumptions
Please note that DR SDK is of type implementation with the following Android API levels and dependencies:
compileSdkVersion 31
minSdkVersion 21
targetSdkVersion 31
implementation 'androidx.appcompat:appcompat:1.4.1'
implementation 'androidx.legacy:legacy-support-v4:1.0.0'
Compatibility
- DR SDK has been tested and certified with Android version 32 or below
- DR SDK has been compiled using Java 1.8
Step 4 : Add necessary files
Step 4.1 : Add google_service.json
Copy the given google_service.json file from the extracted folder to the android\app folder.
The directory structure would look like the image below:

Also add the following code into apps build.gradle file.
repositories {
    flatDir {
        dirs 'libs'
    }
}

dependencies {
    // Other dependencies..
    implementation fileTree(dir: "libs", include: ["*.jar"])
}
Remove idmanager.aarIf you have integrated the DR SDK earlier to 4.7.1 with idmanager.aar file, you wil have to remove the same from
libsfolder to avoid the conflicts during compilation.idmanager, has bee completely integrated inside the v4.7.1 version of the DR SDK.
Step 4.3 [Optional]: Add Rich Notification watermark
DR Rich Notification enables placement of a watermark image on the Rich Notification media. In-order for the watermark to be displayed, place the png image in the assets folder found under node_modules\react-native-iu-library\android\src\main\ and rename the as rich_notification_logo.png
The directory structure would look like the image below:

Step 5: Update build.gradle files
Step 5.1 Update build.gradle in app folder
Open build.gradle file in app folder and the google-services plugin at the end of the file
apply plugin: 'com.google.gms.google-services'Add the repositories inside android code block
android {
  ...
  repositories {
    flatDir {
      dirs "../../node_modules/react-native-iu-library/android/libs"
    }
  }
}
Step 5.2 Update build.gradle in android folder
android folderAdd the classpath variable in the dependencies section of the gradle file
dependencies {
  ...
	classpath 'com.google.gms:google-services:4.3.10'
}
Step 6 : Add the following ProGuard exception rules
If you have minifyEnabled trueIt is important to add the ProGuard rules to make sure all the SDK services will work with minifyEnabled = true
-keepattributes Signature
-keepattributes InnerClasses
-keepclassmembers enum * {
    public static **[] values(); public static ** valueOf(java.lang.String);
}

-keep class amazonia.iu.com.amlibrary.client.IUConfig { *; }
-keep class amazonia.iu.com.amlibrary.data.** { *; }
-keep class amazonia.iu.com.amlibrary.dto.** { *; }
-keep class amazonia.iu.com.amlibrary.config.AppStateManager { *; }
-keep class amazonia.iu.com.amlibrary.cache.BaseStorageCache$** { *;}
-keep class amazonia.iu.com.amlibrary.diagnostics.Command { *; }
-keep class amazonia.iu.com.amlibrary.diagnostics.Command$** { *; }
-keep class amazonia.iu.com.amlibrary.instructions.Instruction { *; }
-keep class amazonia.iu.com.amlibrary.instructions.Instruction$** { *; }
-keep class android.content.pm.IPackageInstallObserver {*; }
-keep class amazonia.iu.com.amlibrary.actions.silent.SilentInstallAppFromServerFactory { *; }
-keep class amazonia.iu.com.amlibrary.vas.VasInfo {*; }
-keep class amazonia.iu.com.amlibrary.vas.VasAcknowledgementDTO {*; }
-keep class amazonia.iu.com.amlibrary.vas.VasRequestDTO {*;}
-keep class amazonia.iu.com.amlibrary.vas.VasResponse {*;}
-keep class amazonia.iu.com.amlibrary.client.IUApp {*;}
-keep class amazonia.iu.com.amlibrary.activities.fragment.VideoPlayerFragment{*;}
-keep class amazonia.iu.com.idmanager.dto.** { *; }
-keep class amazonia.iu.com.amlibrary.client.OTAPromotionReceiverListener { *; }
-keep class amazonia.iu.com.amlibrary.client.NotificationsListener { *; }
-keep class amazonia.iu.com.amlibrary.client.OtaEvent { *; }
Step 7 : Update AndroidManifest.xml
7.1 Disabling backup
In the AndroidManfest.xml file, kindly set the allowBackup to false in the Application tag.
<application
    android:allowBackup="false"
    android:fullBackupContent="@xml/backup_descriptor" ...>
  ...
</application>
Sample backup_descriptor code is below. Place it in res/xml/ folder.
<?xml version="1.0" encoding="utf-8"?>
<full-backup-content>
    <exclude
        domain="sharedpref"
        path="IU_AMAZONIA.xml" />
</full-backup-content>
7.2 Allowing HTTP traffic from the APP
Please add the following line of code to Application tag in AndroidManifest.xml. This would enable the API call for Head enrichment to receive phone number on the DR servers.
Path of AndroidManifest: <path of project>/android/app/src/main/AndroidManifest.xml
android:usesCleartextTraffic="true"7.3 Permissions for Querying installed applications list
[DEPRECATED] With Android 11 and above, Google has restricted the apps from reading the other applications which are installed on phone (Link : https://support.google.com/googleplay/android-developer/answer/10158779?hl=en)
If QUERY_ALL_PACKAGES is added to manifestIf QUERY_ALL_PACKAGES is added to manifest then you would to declare this permission and follow the steps while uploading the build to Google Play Store. This step is mandatory and FULLY the app's responsibility.
(Link : https://support.google.com/googleplay/android-developer/answer/9214102?hl=en)
If you still need to collect installed apps, please add the following snippet to your Android Manifest:
<queries>
    <intent>
        <action android:name="*" />
    </intent>
</queries>
Google PolicyNote that if you choose to access user's installed apps, it is mandatory that a runtime permission is added to your app letting the end user know about the collection, its purpose, and allowing for an opt-out. The Data Disclosure dialog can be used for such runtime permission.
7.4 REQUEST_INSTALL_PACKAGE Permission (Optional)
DR SDK contains REQUEST_INSTALL_PACKAGE permission for all the versions below v4.11.1 (including v4.11.0).
Please check if your app falls into any of the following categories:
- Web browsing or search;
- Communication services that support attachments;
- File sharing, transfer or management;
- Enterprise device management.
- Backup & restore
- Device Migration / Phone Transfer
If the app is not apart of the above category It would be advisable to remove it from the AndroidManifest.xml with help of the code below.
<manifest xmlns:android="http://schemas.android.com/apk/res/android"
    xmlns:tools="http://schemas.android.com/tools"
    package="your.package.com">

      <uses-permission android:name="android.permission.REQUEST_INSTALL_PACKAGES"  tools:node="remove"/>

</manifest>
DR SDK with v4.11.1 and above will have this permission removed.
7.5 Support for Ad-Mob SDK (Optional)
In case the host application is already having Ad-Mob SDK and related Meta data in manifest, we are likely to see the error which looks similar to one as shown below:
Merging Errors: Error: Attribute meta-data#com.google.android.gms.ads.APPLICATION_ID
@value value=(ca-app-pub-8647026263512754~4219912420) from AndroidManifest.xml:33:13-67
is also present at AndroidManifest.xml:240:13-67 value=(ca-app-pub-8647026263512754~
4219312429). Suggestion: add 'tools:replace="android:value"' to <meta-data> element
at AndroidManifest.xml:31:9-34:15 to override. IUAmazonia.iutestapp main manifest
(this file), line 32
On receiving this error, please add the following attribute into the manifest tag on the top of the file
xmlns:tools="http://schemas.android.com/tools"Final manifest tag will look similar to one below:
<manifest xmlns:android="http://schemas.android.com/apk/res/android"
          xmlns:tools="http://schemas.android.com/tools">
Add the following tag to Ad-Mob meta-data tag
tools:replace="android:name, android:value"Sample of final <meta-data> tag would be look similar to the code as below:
<meta-data
    android:name="com.google.android.gms.ads.APPLICATION_ID"
    android:value="ca-app-pub-8647026263512754~4219912420"
    tools:replace="android:name, android:value" />
iOS
Step 8
Step 8.1 Pod Install
iOS SDK is installed via CocoaPods:
cd ios && pod install
Compatiblity
- DR SDK is compatible with iOS 12 and greater
Step 9: Add Local Config file
Add the LocalConfig.plist located on the ZIP file into your iOS project in Xcode (inside the ios folder of your React Native project: projectName.xcworkspace).
This property list file looks similar to the following but with the correct values for your organization:
<?xml version="1.0" encoding="UTF-8"?>
<!DOCTYPE plist PUBLIC "-//Apple//DTD PLIST 1.0//EN" "http://www.apple.com/DTDs/PropertyList-1.0.dtd">
<plist version="1.0">
<dict>
	<key>organization</key>
	<string>IU</string>
	<key>organizationId</key>
	<string>5a294f81993c8f1570c2550d</string>
	<key>fallbackURL</key>
	<string>https://sdk.digitalreef.com/v1/configs/remote</string>
	<key>timerTriggerConfig</key>
	<string>86400</string>
	<key>version</key>
	<string>1</string>
	<key>buildType</key>
	<string>SDK</string>
	<key>fcmProjectId</key>
	<string>iu-android-sdk</string>
	<key>fcmSenderId</key>
	<string>117519441630</string>
	<key>fbRemoteProjectId</key>
	<string>iu-android-sdk</string>
	<key>fbRemoteAPIKey</key>
	<string>AIzaSyAuiuXvkX3hbXTZv1q1KUh3PbvvTT2tb04</string>
	<key>fbRemoteAppId</key>
	<string>1:117519441630:android:7962cb3d01ff3cc2</string>
</dict>
</plist>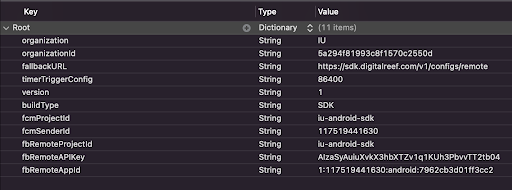
Step 10: Add Permissions
DR SDK needs few permissions which are listed below:
- NSUserTrackingUsageDescription
- UIBackgroundModes
- Background fetch
- Remote notification
Please add NSUserTrackingUsageDescription as a key to your original Info.plist file. Add the correct description for using the IDFA:

Add the following Background Modes:
Step 11: Enabling Rich Media and Push Buttons
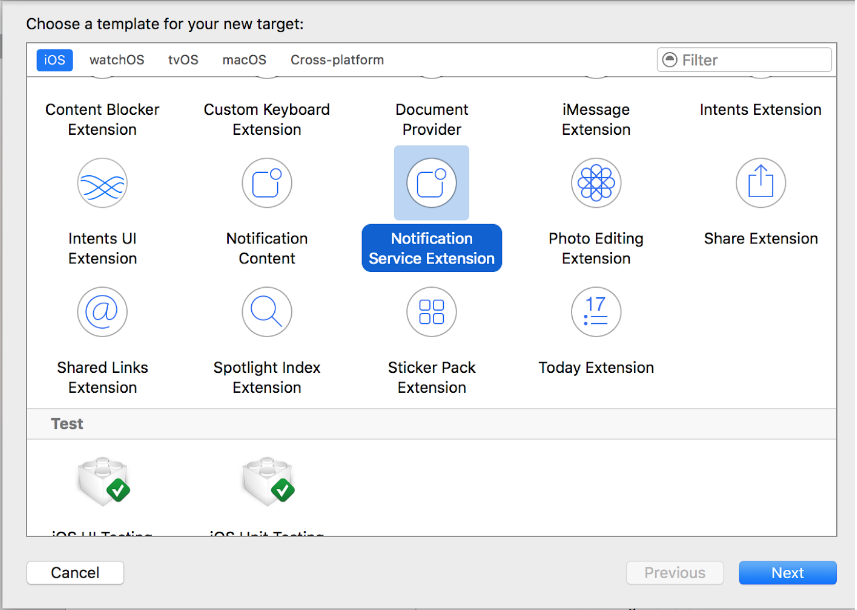
Open projectName.xcworkspace file in Xcode. As of iOS 10, it is possible to send attachments in the body of the push in the formats of images, gifs, videos and buttons. To enable this functionality it is necessary to create a Service Extension.
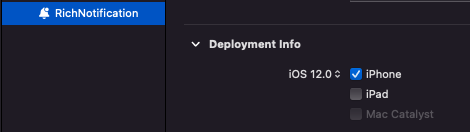
File > New > Target and select Notification Service Extension
Make sure iOS version 12.0 or greater is selected for this Target
Make sure to install our SDK to this target. For that, open your Podfile and add the DR SDK pod to your new extension target:
target 'YourNotificationServiceExtensionTarget' do
  pod 'iOSDigitalReefSDKPods', :git => 'https://github.com/Digita1Reef/iOSDigitalReefSDKPods'
end
In NotificationService.m file, include the call to the framework so that it presents the media in the notification:
- (void)didReceiveNotificationRequest:(UNNotificationRequest *)request withContentHandler:(void (^)(UNNotificationContent * _Nonnull))contentHandler {
self.contentHandler = contentHandler;
self.bestAttemptContent = [request.content mutableCopy];
BOOL adAvailable = [[request.content.userInfo objectForKey:@"adAvailable"] boolValue];
if(adAvailable){
[DigitalReef includeMediaAttachmentWithRequest:request mutableContent:self.bestAttemptContent contentHandler:self.contentHandler];
}
// Further notification handling by Host App
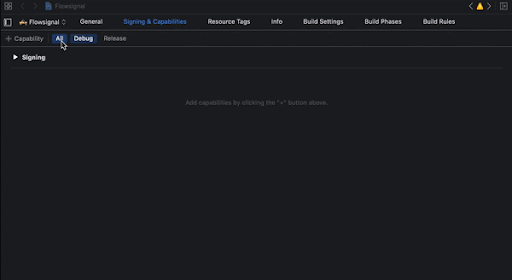
}Step 12: Add App Groups
Go to your app target and add a Capability called App Groups. Do the same for your Rich Notification target:
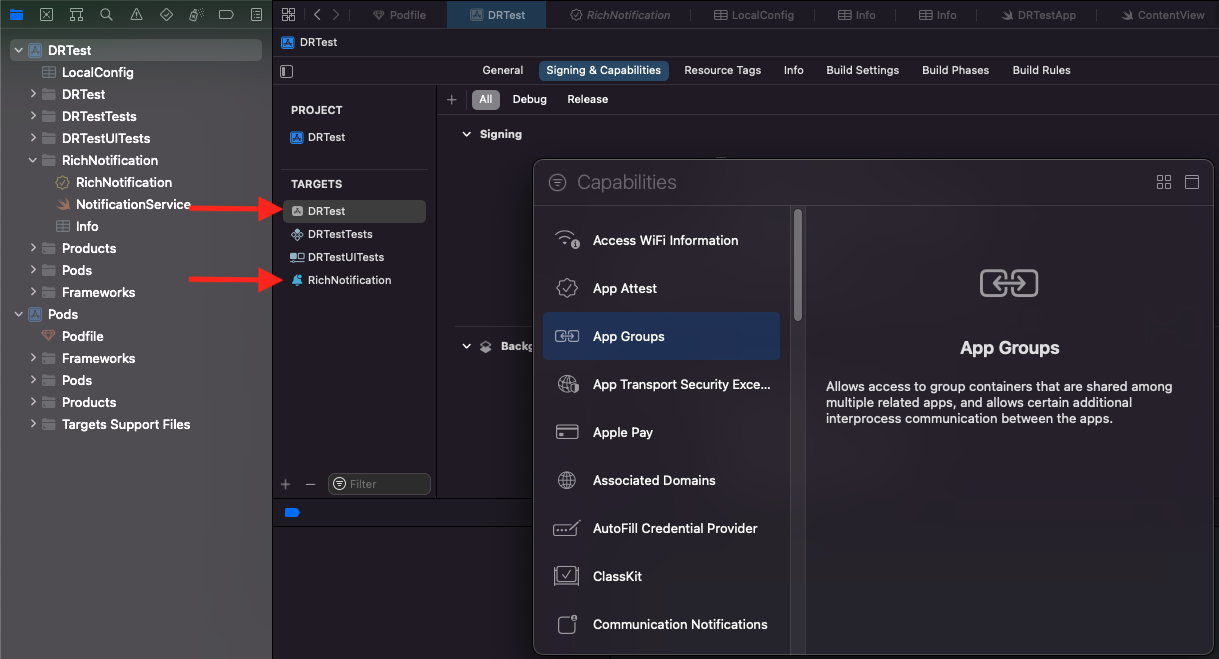
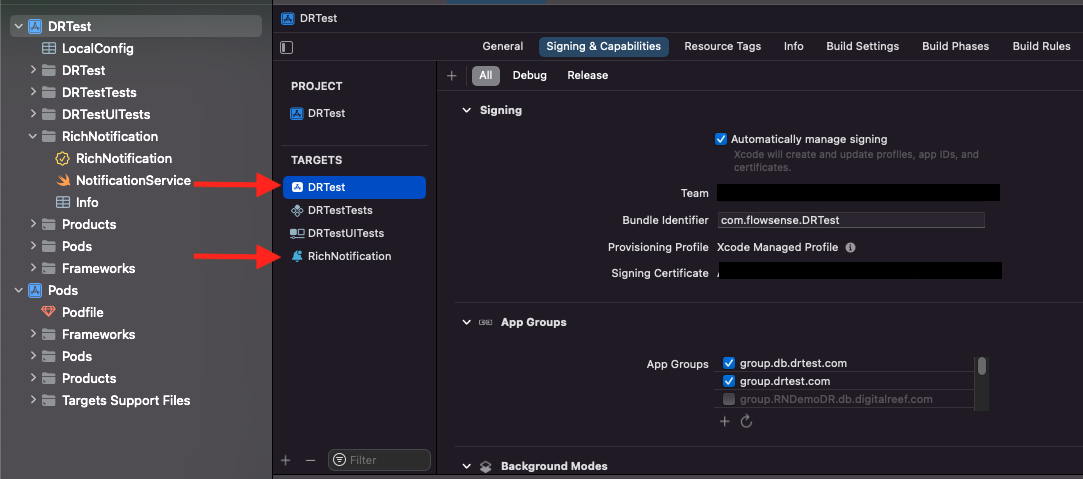
Add the following App Groups to:
- Host Application's
Info.plist - Rich Notification service extension's
Info.plist
App Group DataApp Group's data should be same in both Host Application and Rich notification service extension.
<key>dbAppGroup</key>
<string>group.db.YOURAPPNAME.com</string>
<key>userDefaultsAppGroup</key>
<string>group.YOURAPPNAME.com</string>
Once added it would be similar to the image below

App Groups NamingAppGroups string must be different for each host application otherwise there will be a shared database storage and shared user defaults storage between different apps.